

Creating a gallery wall can be an exciting yet daunting task. Many people hesitate to start because they fear making mistakes that could ruin their space. Without a solid plan, you may end up with a layout that feels chaotic rather than cohesive. This guide will help you avoid that pitfall.
By following these steps, you’ll learn how to effectively plan your gallery wall layout, ensuring that every piece complements the others and fits beautifully in your space. You will discover the importance of selecting your artwork, arranging it in a way that flows, and ultimately achieving a stunning gallery wall that reflects your personal style.
This article is aimed at those with beginner skills and will take approximately 2-3 hours to complete. You will learn practical tips for measuring your wall, choosing your artwork, and arranging everything before you hang it.
Let’s get started on transforming your wall into a captivating centerpiece!
TL;DR Summary
- Gather all materials and artwork before starting.
- Measure your wall space for an accurate layout.
- Create a mockup of your arrangement on the floor.
- Hang your artwork following your planned layout.
TL;DR Summary
Editor’s Choice

KURUI 303Pcs Picture Hanging Kit, Picture Hangers Assorted Kit with Heav…

CRAFTSMAN 25-Ft Tape Measure with Fraction Markings, Retractable, Self-L…

Fuxi 9″ x 12″ Sketch Book, Top Spiral Bound Sketch Pad, 100 Sheets 68lb/…
Prerequisites/Materials Needed
- Art pieces (paintings, photos, prints) – at least 5-10
- Frames for each art piece – according to your art sizes
- Measuring tape – 1
- Pencil – 1
- Level – 1
- Hammer – 1
- Nails or picture-hanging hooks – as needed
- Paper or cardboard for mockup – several pieces
- Masking tape – 1 roll
Prerequisites/Materials Needed
Editor’s Choice

184 Pieces Picture Hanging Kit, 20lb, 30lb, and 50lb Picture Hangers, Me…

Elitech Laser Measure 165ft, Digital Laser Tape Measure for Home Decor &…

HUARCEY Gold Framed Vintage Wall Art for Living Room, Flowers Painting C…
Skill Level & Time Estimate
Skill Level: beginner
Total time estimate: 2-3 hours
Breakdown: 30 minutes for gathering materials, 1 hour for planning and mockup, 1 hour for hanging the artwork.
Skill Level & Time Estimate
Editor’s Choice

Building Town Drawing Rustic Gray Picture – City Architecture River Etch…

Torpedo Level Magnetic, Firecore 9 Inch Shockproof Small Leveler Tool wi…

Command 15 lb Large Picture Hanging Strips 14 Pairs (28 Strips), Damage-…
Step 1: Gather Your Artwork

Start by collecting all the art pieces you want to include in your gallery wall. This could be a mix of photos, paintings, or prints. Follow these sub-steps:
- Choose at least 5-10 pieces of art.
- Make sure they vary in size, color, and texture for visual interest.
- Consider the theme or color scheme you want to portray.
Pro Tip: Lay out your pieces on the floor to visualize how they will look together before making any final decisions.
Why this matters: Having a diverse collection will create a more dynamic and eye-catching display.
Time estimate: 30 minutes.
Step 1: Gather Your Artwork
Editor’s Choice

Dreamland Picture Ledge Shelf for Wall, Floating Shelves Set of 2, 36 In…

Command Large Utility Hooks, 7-Hooks, 12-Strips, Organize Damage-Free

Step 2: Measure Your Wall Space
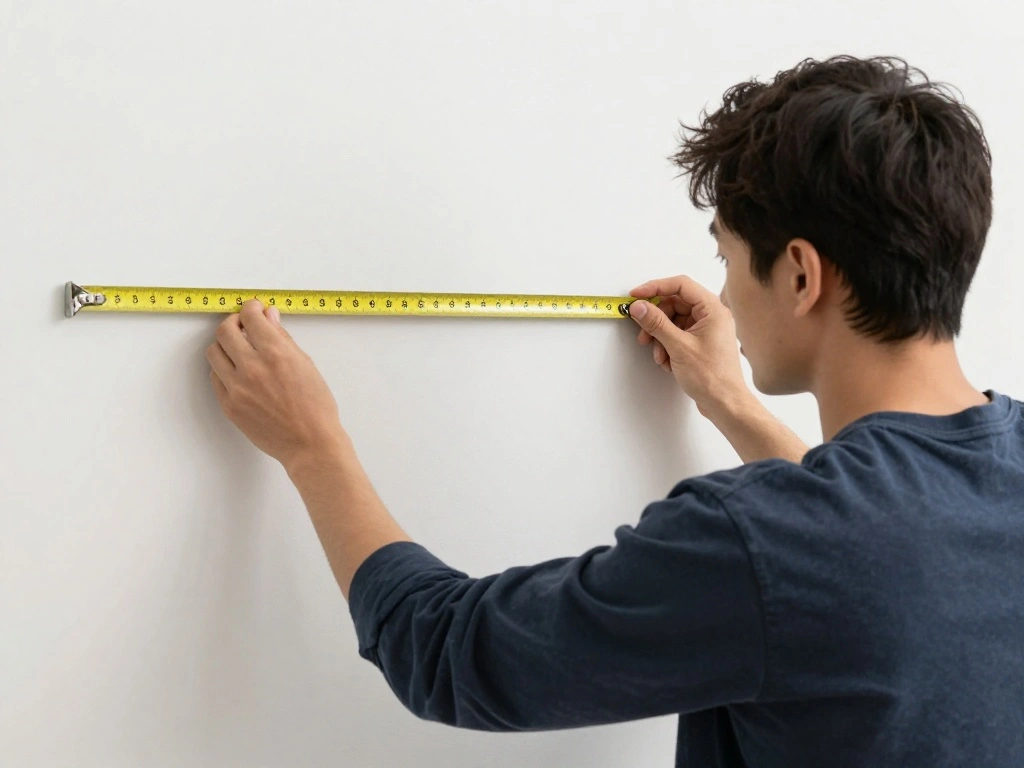
Next, measure the wall where you’ll be hanging your gallery. Accurate measurements are crucial for a balanced look. Follow these steps:
- Use a measuring tape to find the width and height of the wall.
- Note down the measurements on paper.
- Consider the height at which you want to hang your artwork, typically eye level is ideal.
Warning: Double-check your measurements to avoid mistakes that could lead to uneven spacing.
Why this matters: Accurate measurements ensure that your gallery wall fits well in the available space without looking cramped or sparse.
Time estimate: 15 minutes.
Step 2: Measure Your Wall Space
Editor’s Choice
CRAFTSMAN 25-Ft Tape Measure with Fraction Markings, Retractable, Self-L…

Norberg & Linden XL Drawing Set – Sketching, Graphite and Charcoal Penci…
Torpedo Level Magnetic, Firecore 9 Inch Shockproof Small Leveler Tool wi…
Step 3: Create a Mockup Layout
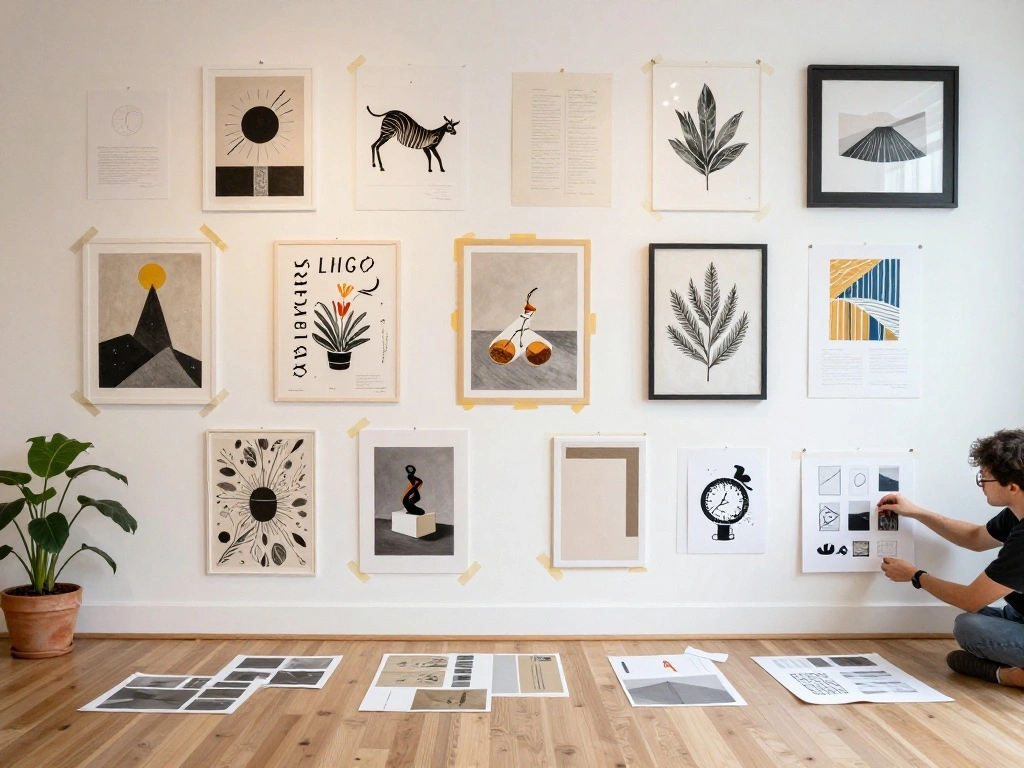
Before hanging your artwork, create a mockup to visualize how the pieces will look together. This will help you avoid any mishaps. Follow these steps:
- Lay out your art pieces on the floor, arranging them in various configurations.
- Use masking tape to outline the dimensions of each frame on the wall.
- Step back and assess the layout; adjust as necessary.
Pro Tip: Take a photo of your layout as a reference when you start hanging the pieces.
Why this matters: A mockup helps you visualize the arrangement and make changes before committing to hanging the artwork.
Time estimate: 45 minutes.
Step 3: Create a Mockup Layout
Editor’s Choice

Scotch General Purpose Masking Tape, 1.88 in x 60.1 yd, Beige, Sticks fo…
Torpedo Level Magnetic, Firecore 9 Inch Shockproof Small Leveler Tool wi…
Step 4: Decide on Hanging Method

Choosing the right hanging method is crucial to ensure your artwork stays secure. Follow these steps:
- Determine whether to use nails, picture-hanging hooks, or adhesive strips based on the weight of your frames.
- For heavier pieces, opt for picture-hanging hooks for extra support.
- For lighter pieces, adhesive strips can work well without damaging the wall.
Warning: Ensure that the method you choose can support the weight of your artwork to avoid accidents.
Why this matters: The right hanging method ensures that your artwork remains securely in place and avoids damage to both the art and the wall.
Time estimate: 15 minutes.
Step 4: Decide on Hanging Method
Editor’s Choice
Command 15 lb Large Picture Hanging Strips 14 Pairs (28 Strips), Damage-…
184 Pieces Picture Hanging Kit, 20lb, 30lb, and 50lb Picture Hangers, Me…
Step 5: Mark Your Hanging Spots

Once you’ve decided on your hanging method, it’s time to mark where each piece will go. Follow these steps:
- Using a pencil, mark the top center of each frame on the wall based on your mockup.
- For heavier pieces, also mark where the hooks or nails will go.
- Use a level to ensure your marks are straight.
Pro Tip: If using multiple hooks for one piece, ensure they are evenly spaced and level.
Why this matters: Properly marking the spots helps you avoid misalignment and ensures a clean, professional look.
Time estimate: 20 minutes.
Step 5: Mark Your Hanging Spots
Editor’s Choice
184 Pieces Picture Hanging Kit, 20lb, 30lb, and 50lb Picture Hangers, Me…
Torpedo Level Magnetic, Firecore 9 Inch Shockproof Small Leveler Tool wi…

Wall Hanging Pencil Holder With Slatwall J Hooks Slatwall Pencil Cup Wal…
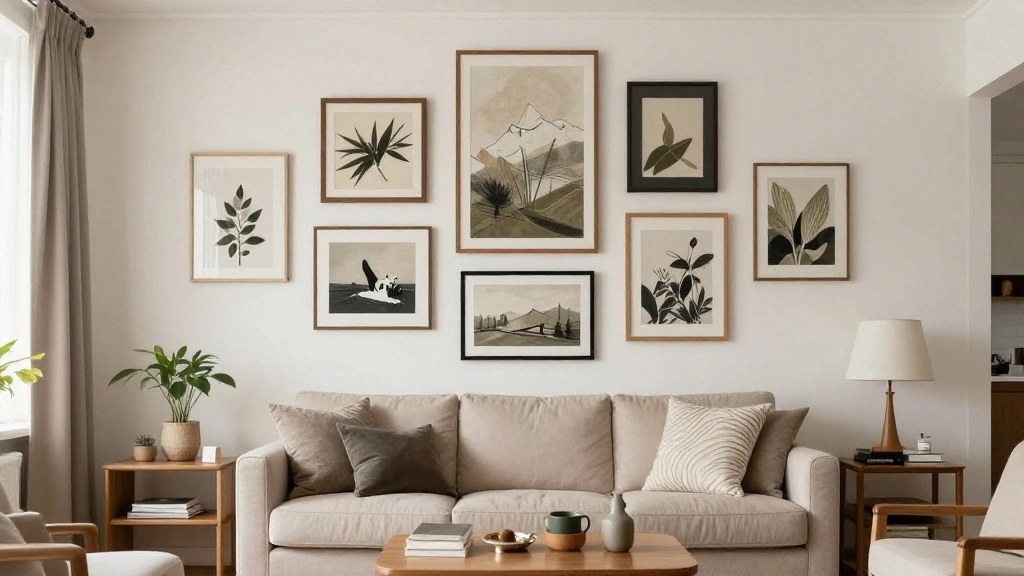
Step 6: Hang Your Artwork

Now it’s time to hang your artwork according to the marks you made. Follow these steps:
- Start by hanging the heaviest pieces first, as they will anchor the layout.
- Use a hammer to gently tap nails or install hooks where you marked.
- Hang each piece and step back to check alignment and spacing.
Warning: Be careful not to damage your artwork while hanging, especially if using nails.
Why this matters: Hanging from the heaviest to the lightest ensures stability and makes adjustments easier.
Time estimate: 30 minutes.
Step 6: Hang Your Artwork
Editor’s Choice
KURUI 303Pcs Picture Hanging Kit, Picture Hangers Assorted Kit with Heav…

Command 15 Lb XL Heavyweight Wall Hook, Damage Free Hanging Wall Hook wi…
Step 7: Step Back and Adjust

After hanging all your artwork, take a moment to step back and see how everything looks. Follow these steps:
- Assess the overall arrangement and check for balance in spacing and visual weight.
- If needed, make adjustments by removing and re-hanging pieces for better alignment.
- Consider adding small decorative items or plants to enhance the gallery wall.
Pro Tip: Ask a friend for feedback on your arrangement; a fresh pair of eyes can provide valuable insight.
Why this matters: Final adjustments ensure that your gallery wall is not only aesthetically pleasing but also harmonizes with the rest of your space.
Time estimate: 20 minutes.
Step 7: Step Back and Adjust
Editor’s Choice


Fun Memories Floating Shelves for Wall, 22.5″ Rustic Wood Deep Wall Moun…
Pro Tips
- Color Coordination: Use a consistent color palette to unify your pieces and create a cohesive look.
- Vary Frame Styles: Mixing different frame styles can add character and depth to your gallery wall.
- Incorporate 3D Objects: Adding shelves or small sculptures to your wall can create a more dynamic display.
- Lighting Matters: Consider installing picture lights or using spotlights to highlight your artwork.
- Seasonal Changes: Feel free to rotate art seasonally to refresh your gallery wall without much effort.
Pro Tips
Editor’s Choice

4-Pack Picture Lights for Wall, Rechargeable Wireless Poster Lights with…

QsQueen Scalloped Wood Wall Shelf – 17 Inch Floating Shelf with Wood B…

8×10 Picture Frame Gold – Picture Frames for Wall Hanging And Tabletop …
Common Mistakes to Avoid
Warning: Hanging pieces too high or low can ruin the overall look. Always aim for eye level.
Warning: Not measuring before hanging may lead to uneven spacing. Always use a measuring tape.
Warning: Ignoring wall types can lead to damage. Use appropriate hanging methods for your wall material.Warning: Overcrowding with too many pieces can make the wall feel chaotic. Select a balanced number of items.Warning: Forgetting to step back and assess your work can result in misalignment. Regularly check your layout from a distance.
Common Mistakes to Avoid
Editor’s Choice
Torpedo Level Magnetic, Firecore 9 Inch Shockproof Small Leveler Tool wi…
KURUI 303Pcs Picture Hanging Kit, Picture Hangers Assorted Kit with Heav…
CRAFTSMAN 25-Ft Tape Measure with Fraction Markings, Retractable, Self-L…
Troubleshooting Section
Problem: My artwork looks unbalanced.
Solution: Reassess spacing and adjust pieces to create a more symmetrical look.
Problem: Some frames are crooked.
Solution: Use a level to realign frames, ensuring they hang straight.
Problem: Wall damage after hanging.
Solution: Fill holes with spackle, and touch up with paint if necessary.
Problem: My wall looks empty after hanging.
Solution: Add smaller pieces or decorative items to fill gaps and create interest.
Problem: I used the wrong hanging method.
Solution: Replace with the appropriate hardware and re-hang the artwork securely.
Troubleshooting Section
Editor’s Choice

DAP DryDex Spackling Wall Repair Patch Kit, with Pink/White Dry Time Ind…

STAS Cliprail Pro Picture Hanging System Set White – Covers 4.92 ft of W…
Torpedo Level Magnetic, Firecore 9 Inch Shockproof Small Leveler Tool wi…
Variations/Alternative Methods
Consider these options for your gallery wall:
- Grid Layout: Use a structured approach where all pieces align perfectly, creating a clean, organized look.
- Salon Style: Hang pieces in a more casual, overlapping manner for a whimsical and eclectic feel.
- Floating Shelves: Use shelves to display art and objects, allowing for easy swapping and adding depth.
Variations/Alternative Methods
Editor’s Choice

Command Picture Hanging Strips Variety Pack, Damage Free Hanging Picture…

Miracliy 4 Pack Mini Fake Plants Artificial Eucalyptus Faux Plants for H…
FAQs
What if I don’t have enough artwork?
You can fill the gaps with mirrors, decorative plates, or wall sculptures for added interest.
How long should I wait before rearranging my gallery wall?
It’s good to let the arrangement sit for a few weeks to see how you feel about it before making changes.
Is it safe to hang heavy frames on drywall?
Yes, just ensure that you use appropriate anchors or hooks designed for heavy objects.
What size frames should I use?
Consider using a mix of sizes to create visual interest, but avoid going too small in proportion to your wall.
How do I maintain my gallery wall?
Regularly dust frames and clean glass to keep your gallery looking fresh and new.
FAQs
Editor’s Choice
4 Piece Ceramic Plates Set, 8.5 Inch Dessert, Salad and Appetizer Plates…

Mirrors for Wall Gold Circular Art Classic Metal Iron Frame Wall Mirror …

Sexy Woman Ornaments, Resin Naked Kneeling Art Sculpture for Bedroom Liv…
Conclusion
Congratulations! You’ve successfully planned and executed your gallery wall layout. Your space now reflects your personal style and creativity.
As a next step, consider adding seasonal decor or changing out artwork to keep your gallery feeling fresh and inspiring. Explore other areas in your home where you can apply similar techniques for a cohesive look throughout.
Remember, the most important part is to have fun and let your personality shine through your art choices. Happy decorating!